Chocolate · Sweets

Chocolate Peppermint Bark

Today, I’m sharing with you my new favourite sweet treat, homemade chocolate peppermint bark. Now to be honest I’m not convinced that this needs a recipe, as it is so ridiculously simple, but I felt that it was so delicious, that I just had to share it with you!

Peppermint bark 2

[Note: This recipe can be (and will be) adapted in as many different ways as you see fit, so feel free to change the combinations to match whatever flavours you prefer.]

peppermint bark

Chocolate Peppermint Bark

Ingredients: 

(To make one 9″x9″ pan)

  • 200g dark chocolate (the better the quality, the better the overall product)
  • 200g white chocolate (as above)
  • 1 tsp peppermint extract
  • A few drops of green food colouring
  • 2 peppermint aero bars, roughly chopped

Instructions:

Line a 9″x9″ tin with tin foil. Melt the dark chocolate over a pan of simmering water and pour into the tin, spreading out to cover the bottom. Place in the fridge and leave to set.

Melt the white chocolate over a pan of simmering water and add the green food colouring and peppermint extract. Pour over the set dark chocolate and spread to cover the first layer of chocolate. Cover the top with a layer of chopped mint aero pieces and leave to set in the fridge. Once completely set, break into large pieces, using a sharp knife to help you if needed.

Baking · Cake · Europe · Marzipan Modelling · Muffins · Nation Cake Challenge · Uncategorized

Norway: Espresso and Blueberry Muffins

Flag of Norway Español: Bandera de Noruega Før...

Trivia fact of the day, Scandinavian countries drink the most coffee (per capita) in the whole world. Out of the top 6 countries (according to Wikipedia), the only other country to come close is the Netherlands – hardly a surprising inclusion. We mentioned the importance of coffee during the creation of the Icelandic Slongakuka, but today we are going for a different take, and travelling rather to the mainland of Scandinavia, Norway.

Norway muffins 1

Coming in a second place – Finland takes first – Norway consumes 9.9kg of coffee per person, per year. The coffee culture in this country is on of the most developed in the world, and is an integral part of the societal culture. This cake was designed to incorporate this important flavour, but to combine it with a fruit into a muffin that could be eaten alongside. Blueberries grow throughout Norway, and their natural affinity with coffee made them a natural option to include in the cake. The coffee flavour is very strong in this recipe, hence the title ‘espresso’. If you prefer a lighter flavour, then halve the quantity.

Norway Muffins 2

Espresso and Blueberry Muffins 

Ingredients:

  • 8oz butter
  • 8oz caster sugar
  • 4 eggs
  • 1 tsp vanilla essence
  • 8oz plain flour
  • 3 tsp baking powder
  • 3 tbsp instant coffee
  • 3 tbsp boiling water
  • 2 punnets of blueberries
  • 120g butter
  • 375g icing sugar
  • 2 tbsp instant coffee
  • 30ml boiling water
  • White icing
  • Blue food colouring
  • 1 tbsp cocoa powder.

Instructions:

Preheat the oven to Gas Mark 5 and line a 12-hole muffin tin with muffin liners. Cream together the butter and sugar, before adding in the eggs and vanilla extract. Beat in the flour and baking powder and mix well. Dissolve the coffee in the boiling water before adding to the cake mixture and beating until completely combined. Reserve 1/4 of the blueberries and gently fold the remainder into the cake mixture, trying not to break the berries. Spoon the mixture into the cases and bake in the oven for 30 minutes until golden brown and cooked through. Leave to cool completely.

Whilst the cakes are cooling, make the flowers.Take a golf ball sized piece of white icing and briefly knead it, before using a few drops of blue food colouring to create a pale blue fondant. Roll it out to 3mm thick and cut out flower shapes using both a small and large cutter. Colour another golf ball sized piece of fondant brown using the cocoa powder before following the same process to cut out more flowers. These may be either used individually or stacked. Set aside to dry.

Once the muffins are cool, make the icing by beating the butter, icing sugar and coffee (again dissolving the instant coffee in the boiling water) until it is thick and fluffy. Spoon into a piping bag fitted with a large star-shaped nozzle and pipe onto the top of each muffin, before decorating with the icing flowers and reserved blueberries.

Baking · Cake Decorating · Cupcakes · Europe · Nation Cake Challenge · Sugar Flowers

Estonia: Rhubarb, Rose and Cardamom Cupcakes

Flag of Estonia

The development of a national cuisine is an ever-changing process. It is affected by many things, from global climate issues to historical events, all of which can drastically change the food that is eaten by a national people. Estonia is a clear example of this; the elimination of much of the culinary leaders during the USSR annexation of 1940 resulted in a country viewing food simply as a way of survival. Food was scarce, both the variety of foods available, but also the amount of food. The many restaurants were either shut down completely or reopened, providing Soviet cuisine. As a result, traditional Estonian food became less and less usual. Alongside this ran an influx of new culinary influences through the many displaced immigrants from other eastern Europen countries, who all played their part in adding a great amount of diversity to the existing culinary minds. After the annexation, Estonians took advantage of the diversity in ingredients, fusing traditional ideas with new concepts, brought in from countries all over Europe. The existing meat-and-potato based cuisine has been extended to include more uncommon fruits and vegetables and as a result to develop a tradition of food which is far more exciting than was previously available.

Estonia Cake Final 2

This recipe makes use of rhubarb, the lovely deep pink stems of which are seen in many Estonian gardens. A very popular cake in Estonia contains rhubarb and cardamom, so I combined these two flavours with hint of ginger and a dash of rosewater to create a cake which takes traditional Estonian flavours and brings them forward into a decidedly modern cupcake.

Estonia Cake final 1

Rhubarb, Rose and Cardamon Cupcakes

Ingredients:

  • 4 eggs
  • 8oz caster sugar
  • 8oz butter
  • 8oz plain flour
  • 3 tsp baking powder
  • 1 tsp vanilla essence
  • 25 cardamon pods, seeds removed OR 1 ts ground cardamon
  • 1/2 tsp ginger
  • 8 sticks of rhubarb
  • 2 tbsp caster sugar
  • 10ml cup water
  • 1 tsp rosewater
  • 80g butter
  • 250g icing sugar
  • 2 drops red food colouring
  • decorations of your choice

Instructions:

Preheat the oven to gas mark 5, and line 2 12-hole bun tins with bun cases. Set aside for later.

Cream together the butter and sugar, before beating in the eggs. Add the flour, baking powder, vanilla, cardamon and ginger and mix thoroughly. Spoon into the bun cases and bake in the oven for 25-30 minutes, until and inserted toothpick comes out clean. Remove and leave to cool.

While the cupcakes are cooling, make the  rhubarb filling. Cutthe sticks of rhubarb into small pieces and place in a small pan with the water and sugar. Cook on a medium heat until the rhubarb is falling apart and the mixture is thick, gloopy and sticky. Remove from the heat and strain 4 tablespoons of the mixture through a sieve to produce a pink syrup. Set this syrup aside for later. Leave the remainder of the compote to cool completely

Use a cupcake corer or a small knife to remove a small section from the middle of each cupcake. Fill this hole with the rhubarb compote made earlier. Set aside. Make the buttercream by beating the butter, icing sugar, rosewater and the rhubarb syrup until the mixture is thick and fluffy (about 5 minutes) Add a few drops of red food colouring to create a pink icing. Spoon this in the piping bag with a large star nozzle and pipe onto the top of the cupcake. Decorate with sugarpaste flowers or other decorations of your choice.

Baking · Cake · Cake Decorating · Chocolate · Europe · Nation Cake Challenge

Belgium: Wheat Beer Cake with Chocolate Frosting

Flag of Belgium

When it came to thinking about the Belgian Cake, I knew right away what I wanted to include – chocolate and beer. However the difficulty arose in that I wanted to differentiate the cake from the Chocolate Guinness Cake made earlier. Belgian Beers are very different from Irish Stout and I wanted to reflect that in the cake. As a result I decided to separate the two components, and really tried to highlight the wheat beer used in the cake, allowing the chocolate to complement it rather than overpower it.

Belgium picture final

I present then, the Wheat Beer Cake with Chocolate Frosting. As it says on the tin. You could decorate this cake with chocolate seashell pralines, but if you re anything like me they may not make it to the cake…

Wheat Beer Cake with Chocolate Frosting

Ingredients

The Cake (adapted from here):

  • 2 egg whites
  • 1/2 cup sugar
  • 1/2 teaspoon baking powder
  • 1/4 teaspoon bicarbonate of soda
  • 1/4 cup vegetable oil
  • zest of one large lemon or 2 small lemons
  • 3 tablespoons milk
  • 1 cup all-purpose flour
  • 1/2 cup Hefeweizen or other wheat beer

The Frosting (Hummingbird Bakery Chocolate Frosting):

  • 300g icing sugar
  • 100g unsalted butter
  • 40g cocoa powder
  • 40ml whole milk

Preheat the oven to 350°F. Grease and line two 7in sandwich tins and set aside.

In a medium-sized mixing bowl, whip egg whites until soft peaks form. Mix in the sugar, bicarbonate of soda, vegetable oil, lemon zest and milk and combine thoroughly. Add half the flour and mix in the beer, before adding the remaining flour and mixing until thoroughly combined. Add to the cake tins and bake to 30 minutes until an inserted skewer comes out clean. Remove the cakes from the tin and leave to cool.

To make the frosting, beat together the icing sugar, cocoa powder and butter until the mixture starts to come together. Add the milk a spoonful at a time beating in between each addition. When all the milk has been inorporated, beat the mixture for at least 5 minutes until light and fluffy (the longer you can do this for, the better!) Use either a paddlemixer or an electric hand mixer or else you may regret it!

To assemble the cakes, trim the tops to ensure a level surface and sandwich together with the frosting. Cover the top of the cake with the remainder of the frosting and decorate with chocolate piping and praline seashells.

Baking · Cupcakes · Europe · Nation Cake Challenge · Natural Decorations

Italy: Rosemary and Olive Oil Cupcakes with Chestnut Frosting

English: Italian Flag

Ok, I know that I have already completed a cake for Italy, but I couldn’t resist trying this combination, and my goodness, it works! Loosely based on the Tuscan speciality Castagnaccio, this cake combines the flavours of chestnut, rosemary and olive oil into an intriguingly-delicious flavoured cupcake. The original castagnaccio is a very traditional poor-mans dessert in Italy. Chestnuts have a history of being a crucial food source for the poorer communities of Italy, as the fact that they grew wild meant that anyone could collect and prepare these nuts. The earliest example of castagnaccio can be traced back to Roman times, when they would make a paste from chestnut flour, water and salt and top it with rosemary and pine nuts. Whilst no doubt practical for long marches, I am rather glad they have improved slightly since this point!

DSC_0005

The cupcake base is a dense olive oil and rosemary cake, which is topped with a chestnut frosting. Decorated with a sprinkle of chocolate shavings and a sprig of rosemary, these cakes are beautifully rustic, yet classically delicious in their design. Eat these and dream of being in the beautiful tuscan towns, getting the sun that we are missing dreadfully in the grey cloudy country that is England.

DSC_0006

Rosemary and Olive Oil Cupcakes with Chestnut Frosting

Ingredients:

  • 4 eggs
  • 6oz/56g caster sugar
  • 158ml olive oil
  • 2 tbsp fresh rosemary, finely chopped
  • 7.5 oz/225g plain flour
  • 1 tsbp baking powder
  • 1/2 tsp salt
  • 50g chestnut puree
  • 100ml double cream
  • 10g caster sugar

Instructions:

Preheat the oven to 325°F/160°C/Gas mark 3 and line a cupcake tin with liners. Beat the eggs until foamy and the gradually mix in the sugar. Slowly pour in the olive oil, beating constantly. Add the rosemary, flour, baking powder and salt and mix until well combined. Spoon into the cupcake cases and bake in the oven for 30 minutes until brown and firm to the touch. Remove from the oven and leave to cool completely.

To make the frosting, whip the cream and sugar together until it is holding soft peaks. Add the chestnut puree and mix until well combined. Pipe onto the top of the cupcake and decorate with chocolate shavings and a sprig of fresh rosemary.


Cake · Cake Decorating · Europe · Marzipan Modelling · Nation Cake Challenge

Sweden: Prinsesstårta (Princess Cake)

The flag of Sweden

Happy Eurovision weekend! The Annual Eurovision Song contest is definately a love it-hate it event. We are definately in the ‘love it’ category – I have been excited about this for a while now. As the event is being held in Malmo, Sweden this year, this seemed like a perfect time to have a go at one of the more complex creations of this challenge, the Swedish Princess Cake or Prinsesstårta.

I have something to confess – as of this moment, my knowledge of Swedish cuisine is mostly gathered from IKEA. Disgusting I know. As a result, my target for this cake was to find a recipe for a cake, that couldn’t be bought in IKEA. The Princess Cake immediately caught my eye during the research period due initially to the decoration – green marzipan covering with pink roses – lovely! The next thought was ‘how do you cover a mound of whipped cream with marzipan without it sinking?’ True to form, I never forgo a challenge and the cake was chosen!

Princesstarta

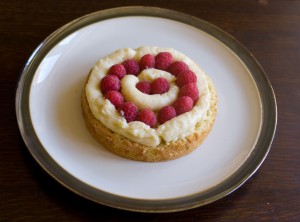
The Princess Cake or Prinsesstårta was originally created in the 1930’s by Jenny Âkerström, a teacher employed by Prince Carl of Sweden and Norway. Originally called Grön Tårta (Green Cake), it was renamed due to its popularity with the Duke’s daughters. A very delicate construction, it consists of three layers of light sponge, sandwiched with creme patisserie and fruit (as shown below),  a layer of plain creme patisserie, and topped with a mound of whipped cream. Next the whole confection is covered in a layer of thin coloured marzipan and and decorated with pink marzipan roses.

Princesstarta layers

The recipe for this cake is based on one by Donal Skehan, taken from here.

Prinsesstårta (Princess Cake)

Ingredients:

For the sponge layers:

  • 4 large free range eggs
  • 170g caster sugar
  • 120g plain flour
  • butter for greasing the tin

For the Crème Patissière:

  • 1 vanilla pod
  • 450ml milk
  • 120g caster sugar
  • 6 large free range egg yolks
  • 50g cornflour
  • 50g unsalted butter, softened

For the filling and assembly:

  • 125g fresh raspberries
  • 750ml double cream, whipped to soft peaks
  • 500g marzipan (use red or pink food colouring
  • if you can’t find pink marzipan)

Instructions:

Preheat the oven to 190°C and grease and line a 20cm springform cake tin with parchment paper.

Beat together the eggs and the sugar until pale and fluffy.  Sift the flour in to the bowl and fold gently into the egg mixture, until you are left with no lumps in the bowl.  Pour the mixture into the cake tin.

Bake on the middle wrack of the oven for 15-20 minutes or until a skewer inserted into the centre comes out clean.  Leave the cake to cool slightly in the tin and then turn it out on to a cooling rack.  When completely cool, using a bread knife, divide the cake into three even layers.

For the crème patissière, split the vanilla pod in half and scrape out the seeds.  Add this to a medium saucepan with the milk and place over a medium high heat.  Bring to the boil and then turn off the heat.  Scoop out the vanilla pod.

While the milk is coming to the boil, place the sugar, cornflour and egg yolks in a large mixing bowl and beat with a whisk until thick and pale.  Pour the hot milk into the bowl, whisking quickly and continuously until it is smooth and incorporated.  Pour the mixture back into the saucepan and place over a medium heat beating continuously until it has thickened.

Transfer the crème pâtissière to a cold bowl, create a flat surface with the back of a spatula and wipe the top with a little butter (this will prevent a skin forming).  Cover directly with cling film and allow to cool completely.

Place one of the cake layers on a cake stand.  Use one-third of the crème pâtissière to pipe three circles around the base of the bottom layer, starting from the outside, in.  Place the raspberries inside the creme patisserie circles.  Mix a spoonful of the cream with a little of the creme patisserie and pipe over the raspberries.  Put on the next layer of cake and spread with half the remaining crème pâtissière over the top. Put the last layer of cake in place and spread the remaining crème pâtissière on top.  Spread the cream over the top and sides of the cake, creating a smooth dome shape.

In a bowl, add a drop of food colouring to the marzipan and knead it until you have an even pink colour.  Dust a clean surface with icing sugar and roll out the marzipan until it’s about 1mm in thickness.  Cover the cake with the marzipan, trimming the excess around the edges. (You can use the excess marzipan to make the little rose on top.)

Dust the cake with icing sugar and place a little marzipan rose on top.

Baking · Cake Decorating · Chocolate · Cupcakes · Europe · Nation Cake Challenge

Belarus: White Russian Cupcakes

National flag of Belarus with sown field pattern

Belarus does not seem to do cakes. Please disagree with me if you can, but I cannot find any recipes in any of my books or on Google, as as they say – if it’s not on Google, it doesn’t happen! Please take it as a challenge – if you know a good Belarus cake recipe, send it my way and I will happily make it! Until this point, this cake will have to do. However, it thoroughly deserves its place, being very delicious!

The name Belarus literally translates as ‘White Russian’, with may different reasons for that name given – ranging from the race of people which populated the area to the colour of clothes that they wore. It was also mentioned in the official titles of the Russian Tsar, who is styled as ‘Tsar of all the Russias: the great, the little and the white’. There is also a fascinating suggestion that the description of regions by colour is based on the points of the compass: north being white, south – black, east – green and west – red.

DSC_0005

However interesting these facts are, the White Russian in this context refers rather to a cocktail, consisting of vodka, Kahlua (a coffee-flavoured liquor) and cream. The cupcakes are flavoured with coffee, filled with whipped cream and topped with Kahlua frosting. They are then decorated with a chocolate cocktail stirrer, embellished with white chocolate stars and popping candy.

DSC_0006

Note: There is no vodka in this cake due to primarily to personal opinion – I cannot stand it! I have never been able to taste it in the drink itself, so do not feel too bad about leaving it out. However, if you would like to include it I would suggest using a small amount to flavour the whipped cream filling.

White Russian Cupcakes

Ingredients:

Cupcakes:

  • 8oz plain flour
  • 8oz caster sugar
  • 8oz butter
  • 3 tsp baking powder
  • 3 tsbp instant coffee, dissolved in 1 tbsp boiling water

Whipped Cream Filling:

  • 100ml whipped cream
  • 3 tbsp icing sugar

Buttercream Frosting:

  • 40g butter
  • 125g icing sugar
  • 2 tbsp kahlua

Chocolate decorations:

  • 10g dark chocolate
  • Popping candy and white chocolate stars

Instructions:

Preheat the oven to gas mark 5, and line a bun tin with paper cases. Cream together the butter and sugar before beating in the eggs. Add the remainder of the ingredients and mix thoroughly until well combined. Spoon into the bun cases and bake for 30 minutes until brown, firm and well-risen.  Remove from the oven and leave to cool completely before continuing.

While the cupcakes are cooking, make the chocolate shapes. On a sheet of greaseproof paper draw out 12 circles using a twopence piece as a guide. Melt the chocolate and spread a small amount on the paper to fill each circle. Pipe a straight line coming out from each circle, making a lollipop shape. Sprinkle with your chosen decorations and leave to set.

Make the whipped cream filling by beating together the cream, icing sugar until thick and creamy. Using a cupcake corer or a sharp knife remove the centre of the cupcake and fill with the vodka-infused cream.

Make the buttercream topping by creaming together the butter and icing sugar until thick and fluffy (about 5 minutes – don’t skimp as this bit is very important!). Add the  Kahlua and mix in thoroughly. Spread or pipe on the top of each cupcake and decorate with the cooled chocolate cocktail stirrers.

Tune back in on Saturday for more chocolate-y goodness, this time from Lithuania!

Baking · Cake · Stencilling

Armenia: Nutmeg Cake

Even on publishing this, I’m still unsure about the correct category to place this recipe in, namely Europe or Asia. Straddling the two continents, there seems to be disagreements about where best to place this country. I am going with Europe as (a) Max says so, and (b) apparently it is said to have the most in common with Europe.

DSC_0003

This cake is apparently very popular in America, where many Armenian people have emigrated to, (and formed bands – during my research I discovered that System of a Down are originally from Armenia) and is sold in many places on the West Coast.  However, whilst I have found many, many recipes for Armenian Nutmeg Cake (seriously, type it into google!), I cannot find many traces of it in traditional Armenian cuisine. The question stands then – is this truly Armenian? Answers on a postcard please. What I can tell you though, is that this is delicious.

DSC_0007

Nutmeg Cake

Ingredients:

  • 15oz/450g plain flour
  • 1 1/2 tsp nutmeg
  • 2 tsp baking powder
  • 1 tsp ground cinnamon
  • 3/4 tsp baking soda
  • 1/ tsp salt
  • 6oz/165g butter
  • 12oz/350g light brown sugar
  • 360ml sour cream
  • 240ml milk
  • 2 eggs
  • 5oz chopped walnuts

Apple Filling:

  •  3 eating apples
  • 2 tsp cinnamon
  • 4 tbsp water

Instructions:

Preheat the oven to 350°F/180°C/Gas mark 4, and grease a loaf tin.

Using a food processor, briefly mix the flour, nutmeg, baking powder, cinnamon, baking soda and salt. Add the butter and pulse until the mixture resembles coarse breadcrumbs. Mix in the brown sugar, sour cream, milk and eggs. Transfer the mixture  to a bowl and fold in the chopped walnuts before scraping into the pan. Bake for 45-50 minutes until an inserted skewer comes out clean. Leave the cake to cool in the pan.

To make the apple filling, heat all the ingredients in a small pan until the apples are soft and the liquid has evaporated, adding extra water if needed to ensure a softened filling. Use a long-bladed serrated-edged knife to cut the cake in half, and spread the bottom half with the apple filling. Top with the second half of the cake, and  using a stencil, sift icing sugar over the top of the cake to create a pattern.

Baking · Cupcakes · Nation Cake Challenge · Natural Decorations · North America

Mexico: Chilli Chocolate Cupcakes with Horchata Frosting

Flag of Mexico See also: List of Mexican flags

Mexican food is a prime example of a fusion cuisine – the original cuisine of the Aztec people combined with the European cuisines of those who came over during the Spanish Conquest of 1519-21. Whilst the Spanish conquistadors made a failed attempt to superimpose the Spanish style on the conquered Aztec peoples, elements of the cuisine did enter the Mexican recipe books and are recognisable today. Due to the strong links between the cultural traditions and the cuisine, Mexican cuisine has been denoted an intangible cultural heritage by UNESCO – the only cuisine to make the list!

DSC_0006

At the moment, my entire knowledge of real Mexican food has come from the delightful restaurant Wahaca, and the books of it’s founder Thomasina Miers. I love Wahaca, and it is always near the top of my list of things to do when I’m near London. These cupcakes are a homage to some of my favourite things on the menu – churros, horchata and mole. It features a chilli chocolate cupcake, filled with a chilli-chocolate ganache and topped with an almond-cinnamon buttercream frosting.I then decorated these with a red chilli and a sprinkle of ground cinnamon. Enjoy!

DSC_0408

Chilli Chocolate Cupcakes with Horchata Frosting

[Note on the spicing: I like my chilli and so enjoyed the quantities shown here. The cakes were not burn-your-mouth-off hot, but there was a definite after-heat from the dried chilli. If you are not a chilli fiend, feel free to decrease the quantities, they will still work well]

Ingredients: (Makes 12)

Chilli Chocolate Cupcakes

  • 4oz plain flour
  • 1.5 tsp baking powder
  • 2 eggs
  • 4oz butter
  • 4oz caster sugar
  • 2 tbsp ground almonds
  • 2 tbsp cocoa powder
  • 2 tsp chilli flakes

Chilli Chocolate Ganache:

  • 100g good-quality chilli chocolate
  • 100ml double cream

Horchata Frosting:

  • 40g butter
  • 125g icing sugar
  • 10ml almond milk (plain milk will do)
  • 1 tsp ground cinnamon
  • 1 tbsp ground almonds

Instructions:

Preheat the oven to 180°C/Gas mark 4. Line a 12 hole baking tin with paper cases and set aside.

To make the cake, cream together the butter and sugar until smooth, before adding in the eggs one at a time. Add the flour, baking powder, cocoa and almonds and mix thoroughly. Add the chilli flakes and stir through. Pour the mixture into the bun cases and bake in the oven for 30 minutes until firm and well risen.Remove from the oven and leave to cool on a wire rack.

Make the chocolate chilli ganache by melting the chocolate in a bain-marie, before adding the cream to the mixture. Leave in the fridge to cool for 30 minutes before using.

Use either a cupcake corer or an apple corer to remove the middle of each cupcake.Fill with a small amount of chilli-chocolate ganache and leave to cool for 20 minutes.

Make the horchata frosting by mixing together the butter and icing sugar until thick and fluffy (about 5 minutes) Add the almonds, cinnamon and milk and beat for another 5 minutes. Spread onto the cupcakes and top with a red chilli and a spinkle of ground cinnamon.

To make the chili flowers shown here, cut the chilli into 8 segments, ensuring you do not cut all the way to the stem (thus leaving the segments attached to the stem and head of the fruit. Place in iced water and leave until curled as shown. This may take quite a while, so don’t worry if it doesn’t happen immediately!

Baking · Cake · Europe · Nation Cake Challenge · Natural Decorations

Croatia: Orange, Almond and Lavender Cake

Civil Ensign of Croatia

Croatia has to be the most beautiful place that I have been to – I spent some time in Dubrovnik once and I can honestly say I have never been anywhere quite like it. The sea, mountains, islands, old city – what more can you ask for?

DSC_0385

This cake had a lot to live up to then. Not only did it have to be delicious, but also look good – challenge accepted! Lavender is a key export of Croatia, and is heavily cultivated on the island of Hvar. I love the taste of lavender, and so it was a no-brainer that I would incorporate this flavour into this dessert. I added the flavours of orange and almond to this, in homage to the orange trees full of fruit which were evident all over Dubrovnik.

DSC_0588

The cake is topped with an orange buttercream and decorated with dehydrated orange flowers and soft gold pearls. The technique used for the orange flowers is the same as that of the pineapple flowers used in the Nyamanku Cake – however they take far longer to dry out, due to the higher water content of the slices. Be patient – the result is worth it!

Orange, Almond and Lavender Cake

Ingredients:

  • 8oz butter
  • 8oz caster sugar
  • 4oz flour
  • 4oz ground almonds
  • 3 tsp baking powder
  • zest of one orange, finely grated
  • 5 tsp lavender (ensure this is edible and has not been adulterated with essential oils!)
  • 125g icing sugar
  • 40g butter
  • zest of 1 orange
  • 10ml orange juice
  • 1 orange
  • 2 tsp lavender flowers.

Instructions:

Preheat the oven to gas mark 5 and grease a 6in round cake tin. Beat together the butter, sugar, flour, eggs, baking powder and ground almonds until well combined. Stir in the lavender flowers and orange zest and pour into the tin. Bake for 50 minutes until golden brown and firm to the touch. leave to cool in the tin for 5 minutes before removing and leaving to cool on a cake rack.

Turn the oven down to gas mark 1 and line a baking sheet with baking parchment. Thinly slice the orange and place in the oven to dry out, turning occasionally. This will take about 2 hours, but check as necessary. Remove from the oven and place into mini muffin tins to air-dry completely.

Make the buttercream by beating the butter and icing sugar until thick and fluffy – it will take about five minutes! Beat in the orange juice and zest to form a thick consistency. Spread over the cake and use a palate knife to smooth the edges and create a nice finish. decorate with the orange slices and the reserved lavender (this is absent on the picture as the wind blew all of mine away – it looked pretty before though!)