Baking · Bread · Nation Cake Challenge · North America

The United States of America: Chilli Cumin Cornbread

Cornbread s described by the Hummingbird Bakery (from which this recipe is taken) as the ultimate cheats bread – it’s quick, needs no rising and can be on the table in under an hour. I love standard cornbread, but this one is a step above. Flavoured with chilli and cumin, and with the addition of sweetcorn to add texture, this loaf is excellent to eat as an accompaniment to chowders or soup, with cheese as part of a salad lunch or just on its own, warm from the oven with melted butter.

Chilli Cumin Cornbread

Chilli Cumin Cornbread

Ingredients:

  • 20g ground cumin
  • 150g plain flour
  • 1 tsp baking powder
  • 1/2 tsp bicarbonate of soda
  • 50g light brown sugar
  • 60g polenta
  • 1/2 tsp chilli flakes
  • 1 tsp salt
  • pinch of groud black pepper
  • 2 large eggs
  • 90g sour cream
  • 100ml milk
  • 120g sweetcon (defrosted if frozen)

Instructions:

Preheat the oven to Gas Mark 4 and grease and line a a loaf tin with baking parchment.

Mix the dry ingredients together until well combined. In a separate bowl, mix together the sour cream, milk and eggs and then add to the dry ingredients. Beat the mixture together until a batter forms. Add the sweetcorn and mix briefly to ensure an even spread.

Pour the batter into the prepared tin and bake for about 30 minutes until an inserted skewer comes out clean. Take it out of the oven and cool briefly in the tin before turning out onto a wire rack  and cooling further – if you can wait that long!

Baking · Cake · Nation Cake Challenge · North America

Hawaii: Pineapple, Coconut and Blueberry Upside-Down Cake

As an American state slap-bang in the middle of the Pacific Ocean, Hawaii is a complete contrast to the rest of mainland America (My lack of geographical knowledge in my younger years becomes painfully evident when discussing the Pacific – until I was 11 I thought that Hawaii was somewhere in the Caribbean!). This tropical paradise (Paradise incidently being one of the archepeligo’s nicknames) enjoys ideal conditions for people from sun-seeking tourists to thrill-seeking surfers and volcanologists. Sadly it has one major issue, in that it is about as far as Britain as possible, therefore making a holiday rather impractical.

I plan to visit Hawaii at some point during my life, and at present the dreams of this island make the grey British January weather rather more bearable. When I walk down the cold, dark roads, I picture myself in Hawaii, eating pineapples (the island’s biggest crop), swimming in the warm sea and generally getting the sun I can’t seem to find at the moment!

pineapple upside down cake

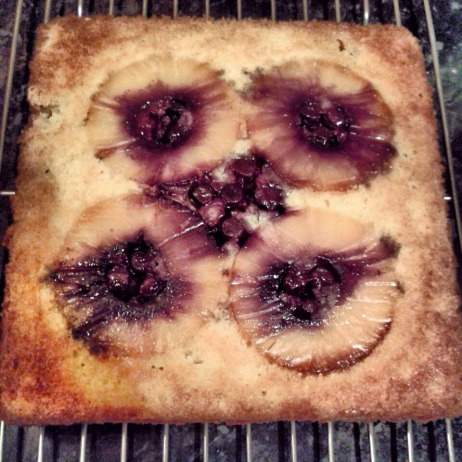
The main aspect of this delicious cake, the pineapple is a major export of Hawaii. Whilst it originated in South America, it was introduced to the islands in the early 1990’s, quickly gaining massive popularity. The two largest pineapple companies (Dole and Del Monte) first started their companies on Oahu (the largest albums) and Hawaiian pineapple is still a massive corner of the market to this day. Combined in this delectable cake is the intensely tropical coconut and some added rum and blueberries to give some extra colour and intensity. Eat this cake and you will forever forget the pineapple upside down cakes of yesteryear.

The recipe was taken from  London Bakes (here)

Pineapple, Coconut and Blueberry Upside-Down Cake

Ingredients:

  • 500g fresh pineapple (canned will do at a push, but fresh is so much better!)
  • 20g fresh blueberries
  • 50g unsalted butter
  • 2 tbsp caster sugar
  • 100ml coconut milk
  • 50g dessicated coconut
  • 1 tsp vanilla extract
  • 30ml rum
  • 165g unsalted butter, softened plus more for the tin
  • 200g caster sugar
  • 2 eggs
  • 185g plain flour
  • 1 1/2 tsp baking powder

Instructions:

Preheat the oven to 175F.  Line a tin with parchment paper and grease well with butter. Don’t use a springform tin unless you want to spill hot syrup all over yourself…

In a saucepan, heat the coconut milk until boiling, before taking off the heat and stir in the dessicated coconut, vanilla and rum.  Leave to cool whilst you prepare the pineapple.

Cut the pineapple into thin slices (if using canned, then just drain the slices slightly).  Melt the butter and sugar in a frying pan and, when hot, add the pineapple slices and caramelize on each side (this will take about 3 minutes on each side). Remove from the heat, allow to cool and place the pineapple in a layer at the bottom of the cake tin.  Pour over the syrup from the pan.  Add the blueberries to the gaps between the pineapple slices.

To make the cake, beat together the butter and sugar until light and fluffy.  Beat in the eggs one at a time until combined and then fold in the flour, baking powder and coconut mixture. Pour into the tin and bake for 25-30 minutes until a toothpick comes out clean and the top is golden brown. Cool in the tin for 15 minutes, then turn out onto a wire rack, carefully peeling off the parchment paper to expose the fruit topping.

Serve with ice cream or cream.

Baking Research · Nation Cake Challenge · North America · Pastry

Hunting for Cronuts

Arizona Flag

When visiting America, one of the items on my ‘must-eat’ list was the wonderfully strange hybrid pastry that has been taking America by storm. That’s right, I wanted a cronut! Now there was a slight issue with this – I was visiting the west coast and Phoenix, whereas the original trademarked pastry is from New York, the creation of the renowned chef Dominique Ansel. However, small details right?

So anyway, I got to Phoenix, and we were planning out our cupcake tasting challenge (more on that to come!), and wondered if there was anywhere that did the elusive cronut. So being a modern person, I turned to the Internet, asking on twitter if anyone could recommend a location. Lo and behold, I got two suggestions, and one in a good location! Sold!

The next morning we piled into the car to head over to the Victorian Cake Company and Candyland Cupcakes for a cronut breakfast. Despite the suggestion that as we could get them at Dunkin’ Donuts (which was closer to home) we persevered, and arrived, preparing to queue up for the elusive cronut! However, excitingly, there was no queue! Less excitingly, this was because it was not open yet… However the owners were lovely, and let us come in, order our cronuts and get them hot out of the oven!

Cronuts 1

The cronut itself was less a combination of the two pastries, and more a completely different cake. a round pastry, consisting of layers of a fried pastry. The croissant influence was evident in the buttery taste, though the doughnut element was harder to identify – possibly the fried element of the pastry? The pastry was then halved and filled with a flavoured cream, and a small amount of icing was added on top. The bakery made three flavours so naturally we sampled all three! The flavours were (from the top) strawberry champagne, french vanilla and cookies and cream. We were pleasantly surprised by the whole concept – it was far less greasy that predicted, and the creme patisserie filling was a great contrast to the fried layers of flaky pastry. Or favourite by far, was the French vanilla cronut, which had a really beautiful fragrant vanilla flavour – I could have eaten the cream with a spoon!

Cronuts 2

Overall conclusion – very good! I can’t honestly say that I would be one of the people who queues up every morning to buy a cronut (they are just so rich!), but as an occassional treat – and in this case holiday breakfast! – they were completely delicious. If you are in the vicinity of Phoenix, The Victorian Cake Company is worth a visit juts for these lovely things!

Baking · Cookies · Nation Cake Challenge · North America

Massachusetts, America: Chocolate Chip Cookies

Flag of the United States of America

Chocolate chip cookies. Possibly one of the most evocative recipes, and one that will be likely to take you back to your childhood, whether they be soft chewy American-style cookies or the small crisp Maryland cookies(/biscuits, depending on your definition of cookies!) For such a popular recipe, it seems surprising that the original chocolate chip cookies were actually an accidental creation by Ruth Graves Wakefield, owner of the Toll House Inn in the 1930’s. Running out of chocolate for her famous chocolate biscuits, she substituted chocolate chips, hoping that they would melt into the chocolate cookie batter which they did not, thus creating the chocolate chip cookie. Apparently she then sold the recipe to Nestle in exchange for a lifetimes supply of chocolate chips – sounds like a good deal to me!

Ruth Wakefield’s recipe is still in use today, printed on the back of every bag of Nestlé chocolate chips (I’m sure many of you will be familiar with the F.R.I.E.N.D.S. episode where Monica spends days trying to recreate Phoebe’s grandmother’s fabulous cookie recipe only to find that it is the Nestlé Toll House recipe!) The cookies were also sent to US troops during WWII, and became so popular that a national craze was started, continuing today. It has also been designated as the Official State Cookie for Massachusetts, though I am not convinced that other states have this honour, so it isn’t really so important!

DSC_0016

Chocolate chip cookies are one of those recipes that everyone will have made at some point, and as a consequence everyone thinks that their recipe is the best! Type ‘chocolate chip cookies’ into Google search and most of the returned results will be titled (or at least mention!) some form of plaudit, that their recipe is ‘the best ever!’ Now at some point when I have more time I feel that I may need to actually test out these recipes and choose a victor, but for the moment all I can say is that these cookies are delicious, and you will not be disappointed!

DSC_0013

Chocolate Chip Cookies

Ingredients:

  • 115g/40z butter, softened
  • 115g/4oz caster sugar
  • 1 egg
  • 100g/3.5oz porridge oats
  • 1 tbsp milk
  • 1 tsp vanilla extract
  • 125g/4.5oz plain flour
  • 1 tbsp cocoa powder
  • 1/2 tsp baking powder
  • 175g/6oz plain chocolate, chopped
  • 175g/6oz milk chocolate, chopped
  • 56g/2oz hazelnuts, roughly chopped

Instructions:

Preheat the oven to 180°C/350°F/Gas Mark 4. Line three baking sheets with parchment paper and set aside for later.

Cream together the butter and sugar until light and fluffy before beating in the egg. Add the oats, milk and vanilla extract and beat together until well blended. Stir in the flour, cocoa and baking powder before adding the chocolate chunks and nuts.

Place tablespoons of the mixture onto the baking sheet, leaving about 2 inches in between each cookie. Bake for 20 minutes before removing from the oven and allowing to cool for 10 minutes. Remove from the baking sheet and allow to cool completely before diving in – I know it’s hard, but it’s so much better to eat them when cool!

Baking · Cupcakes · Nation Cake Challenge · Natural Decorations · North America

Mexico: Chilli Chocolate Cupcakes with Horchata Frosting

Flag of Mexico See also: List of Mexican flags

Mexican food is a prime example of a fusion cuisine – the original cuisine of the Aztec people combined with the European cuisines of those who came over during the Spanish Conquest of 1519-21. Whilst the Spanish conquistadors made a failed attempt to superimpose the Spanish style on the conquered Aztec peoples, elements of the cuisine did enter the Mexican recipe books and are recognisable today. Due to the strong links between the cultural traditions and the cuisine, Mexican cuisine has been denoted an intangible cultural heritage by UNESCO – the only cuisine to make the list!

DSC_0006

At the moment, my entire knowledge of real Mexican food has come from the delightful restaurant Wahaca, and the books of it’s founder Thomasina Miers. I love Wahaca, and it is always near the top of my list of things to do when I’m near London. These cupcakes are a homage to some of my favourite things on the menu – churros, horchata and mole. It features a chilli chocolate cupcake, filled with a chilli-chocolate ganache and topped with an almond-cinnamon buttercream frosting.I then decorated these with a red chilli and a sprinkle of ground cinnamon. Enjoy!

DSC_0408

Chilli Chocolate Cupcakes with Horchata Frosting

[Note on the spicing: I like my chilli and so enjoyed the quantities shown here. The cakes were not burn-your-mouth-off hot, but there was a definite after-heat from the dried chilli. If you are not a chilli fiend, feel free to decrease the quantities, they will still work well]

Ingredients: (Makes 12)

Chilli Chocolate Cupcakes

  • 4oz plain flour
  • 1.5 tsp baking powder
  • 2 eggs
  • 4oz butter
  • 4oz caster sugar
  • 2 tbsp ground almonds
  • 2 tbsp cocoa powder
  • 2 tsp chilli flakes

Chilli Chocolate Ganache:

  • 100g good-quality chilli chocolate
  • 100ml double cream

Horchata Frosting:

  • 40g butter
  • 125g icing sugar
  • 10ml almond milk (plain milk will do)
  • 1 tsp ground cinnamon
  • 1 tbsp ground almonds

Instructions:

Preheat the oven to 180°C/Gas mark 4. Line a 12 hole baking tin with paper cases and set aside.

To make the cake, cream together the butter and sugar until smooth, before adding in the eggs one at a time. Add the flour, baking powder, cocoa and almonds and mix thoroughly. Add the chilli flakes and stir through. Pour the mixture into the bun cases and bake in the oven for 30 minutes until firm and well risen.Remove from the oven and leave to cool on a wire rack.

Make the chocolate chilli ganache by melting the chocolate in a bain-marie, before adding the cream to the mixture. Leave in the fridge to cool for 30 minutes before using.

Use either a cupcake corer or an apple corer to remove the middle of each cupcake.Fill with a small amount of chilli-chocolate ganache and leave to cool for 20 minutes.

Make the horchata frosting by mixing together the butter and icing sugar until thick and fluffy (about 5 minutes) Add the almonds, cinnamon and milk and beat for another 5 minutes. Spread onto the cupcakes and top with a red chilli and a spinkle of ground cinnamon.

To make the chili flowers shown here, cut the chilli into 8 segments, ensuring you do not cut all the way to the stem (thus leaving the segments attached to the stem and head of the fruit. Place in iced water and leave until curled as shown. This may take quite a while, so don’t worry if it doesn’t happen immediately!