America · Desserts · Doughnuts · Illinois · Illinois · Living Abroad · Travelling

The Best Doughnuts in Chicago

So here it is. What you’ve all been waiting for!

The definitive listings of Chicago doughnuts, in reverse order!

8. Donut Delight

Sorry guys – there has to be a last place. We ordered a pineapple old fashioned and couldn’t taste pineapple… 

7. Glazed and Infused

Similar to Donut Delight, there was just not enough flavor. We ordered a Nutella Old Fashioned and it was rather stodgy and though fine, it’s not somewhere I’d run back to.

6. Mariano’s 

The supermarket doughnut ranks higher than several other shops for two reasons – price and amount of bacon ( see image below). 


That is a bacon maple donut.

Also these doughnuts are $0.70. Bargain!


5. Scafuri’s Bakery

This is your childhood in a doughnut- it’s soft, tasty and includes sprinkles. All round, a very successful baked good.


4. Beaver’s Donuts


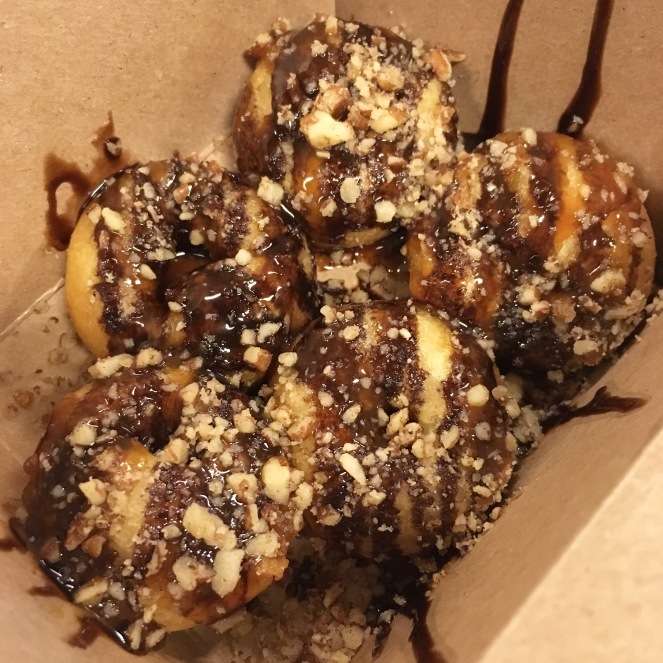
Doughnut holes covered in caramel sauce, chocolate sauce and crushed nuts. Out of the top four these were the softest, possibly most greasiest of the top ones, but still very tasty and good value at $3 for 4 holes (5 in our case!)

3. Doughnut Vault


These rightly earn third place due to three things:

  1. Cuteness of shop
  2. Size of donut
  3. Actual fruit flavor (note the blueberry old fashioned which was the best fruit donut of the lot!


How cute is this? It is tiny inside as well – there is about room for 4 people!

2. Stan’s Donuts

Stan’s almost made it to the No. 1 spot and still does an amazing donut – the chocolate orange old fashioned and the Boston creme donut being of particular note. It also has a full display of Kitchenaids and makes milkshakes with a donut on top. 


And now we come to the top spot… 

1. Do-rite Donuts

We weren’t sure about the top spot – Stan’s was still pretty unbeatable and whilst we agreed that Do-Rite was close, it wasn’t an outright winner.

Until this.


The best donut in Chicago.

Do-Rite’s carrot cake donut. Amazing. 

Why is it so amazing you ask? I give you three reasons:

  1. No raisins – the worst part of carrot cake
  2. Great taste and amazing cream cheese frosting
  3. Softest texture of any donut 

Oh, and coffee is only a dollar. Can’t beat it. 

If carrot cake isn’t your thing, there is also apple fritters:


and chocolate Valhrona donuts


The carrot cake has to be number 1 though!

I’m sorry for the lack of posts – I will try to get back to more consistent posting soon!

Desserts

Chocolate-Baileys Panna Cotta with Mascarpone Cream

It’s been such a long time since I posted regularly, and I miss it. I haven’t posted for so long primarily because of the few times I have baked, the results have not been such that I would like to post them on the blog, and also because I just haven’t baked for a while! Call it health-conscious, lazy, what you will – it just hasn’t happened!

However, I’m going to make a real concerted effort to start posting again, primarily bled goods, but also other recipes that I’ve tried. We are making a real effort to eat healthily and cheaply at the moment and this will hopefully start to chronicle this.

To start with, here is a delicious, impressive but surprisingly simple to make dessert which will impress any diner guests you may have coming over. A layered panna cotta, one flavoured with Bailey’s (Irish Cream Liqueur), the second with dark chocolate, topped with a sweetened mascarpone cream and blueberries. Panna cotta can seem quite intimidating, but I assure you, it is so simple and can be prepared ahead of time for stunning results.

image

I have prepared individual dishes here, but this could also work well as a larger dessert, just be aware it may take longer to set.

Ingredients:

Bailey’s Panna Cotta:

  • 300ml double cream
  • 150ml Baileys/Irish Cream Liqueur
  • 1 sachet of Gelatine, dissolved in 8 tbsp hot water (I used Dr Oetker – see your chosen brand for specific details about amounts if different)

Chocolate Ganache Panna Cotta:

  • 150ml Double cream
  • 1/2 sachet of gelatine, dissolved in 8 tbsp water
  • 75g dark chocolate, chopped

To Finish:

  • 300g mascarpone cheese
  • 4 tbsp icing sugar
  • Grated dark chocolate
  • 6 crushed amaretti biscuits
  • Blueberries, to decorate

Instructions

Make the Bailey’s Panna Cotta by putting the cream, dissolved gelatine and baileys in a small pan over a medium heat, and bring to the boil (stirring constantly). Pour into 6 small serving dishes and leave to set in the fridge for an hour.

Once the hour is up, add the second lot of cream, gelatine and chopped chocolate to a small pan and heat until the chocolate is melted and the mixture is just coming to the boil. Remove from the heat and allow to cool for 2 minutes, before pouring onto the cooled dishes. Return to the refrigerator until completely set.

Before serving, beat the icing sugar and mascarpone cheese until thick and fluffy, adding in a little vanilla if desired. Spoon into a piping bag and pipe a swirl onto the top of each dish, garnishing with some crushed amaretti biscuits, blueberries and grated dark chocolate.

America · Desserts · Travelling

Day 2: Zion National Park and The Grand Canyon

Today we had two places on the agenda, both of which were in completely different directions to each other, thus necessitating a lot of driving around! We started by going to Zion National Park in Utah. This was an odd drive, as it was not very long before we entered the park itself, but then it took us about 45 minutes of driving through the park to get to the main bit! Parking was also very busy, so we actually ended up driving out the other side to find a space, and then catching the shuttle bus back into the park!

Once inside we took another bus through the beautiful gorges and canyons to the temple of Sirawaya, deep in the park. I was amazed by the height of the rock walls – when in the midst of the canyon you had to look almost straight up to see the top! It also made me think of the Lion King, a thought reinforced by looking at the pictures – does anyone else think this, or am I just odd?
image

image

image

There were also a lot of posing squirrels, who obviously are used to humans wanting to take their picture, as they have developed almost model-like characteristics!

We then moved on to a long drive back through Kanab and into Arizona again to the North Rim of the Grand Canyon which was an amazing experience. Now Max has been to the South Rim and we have both seen the West Rim (and done the Skywalk) previously, but we both felt that neither was a patch on the North Rim! It was so green and beautiful, but whilst still providing you with the awe-inspiring grandeur that the canyon is famous for. We walked out to some viewing points above the canyon, and whilst getting there was terrifying at points, it was worth it for the experience!
image

image

On return to Kanab in the evening, we went to Rocking V’s Cafe again, as we enjoyed it so much last night, and it was again brilliant! We had the same server, Terry who remembered us and was very friendly and helpful, along with the Maître De, and the rest of the staff. Tonight I stuck with the southwestern theme, but went vegetarian, enjoying Corncakes made with polenta and black beans, served with a green chile relish and tomato salsa (along with salad and asparagus). I really wanted a picture to show you, but I was so hungry I didn’t check the shot and so it came out like this.
image

It’s the eternal food blogger issue – you want a good picture, but more than that – you want to eat the food!

We couldn’t resist the puddings again, and this time decided to divide and conquer. Mum and I enjoyed the chocolate mousse – dairy free and oh so thick and delicious! I could eat it all day! Max went for creme brûlée, whilst Dad (who has never before ordered dessert in a restaurant!) could not resist the bread pudding with whiskey sauce! After tasting it I can’t blame him – it was phenomenal! Definitely a must try!
image

image

Overall, for a small border town, Kanab has a culinary jewel in the Rocking V Cafe. I can’t recommend it highly enough, and hope it continues to flourish!

Baking · Desserts

Chocolate Chestnut Pavlova (A Holiday Miracle)

This year, I was allowed to cook dessert for Christmas Day. Now this is a big honour in our house, my dad guards the kitchen zealously, and it is very unusual for him to allow cooking rights to anyone else! This pressure is high as well – he does an amazing Christmas lunch and dessert has to live up to it!

This then was my creation, a decadent chocolate chestnut pavlova. One of my favourite combinations, this delectable dessert was a fitting centrepiece, converting even the meringue-haters amongst the diners – thus providing a holiday miracle!

IMG_20131225_154035_resized

 This may be completed in a variety of styles – I made a two layer rectangular pavlova, sandwiched with the cream and ganache filling. However, you could also make a smaller three-layered circular pavlova – whatever floats your boat really!

 Chocolate Chestnut Pavlova

 Ingredients

  •  4 egg whites
  • 115g caster sugar
  • 115g icing sugar
  • 150g dark chocolate
  • 200g double cream
  • 50g chestnut puree
  • 100g double cream
  • 20g icing sugar
  • Cocoa powder, to decorate

 Instructions:

Preheat the oven to gas Mark 2. Line two baking sheets with baking parchment and draw three 10-in circles on the parchment. Please don’t use pen – ink and meringue is not a flavour combination I would particularly endorse…

In a scrumptiously clean bowl, whisk your egg whites until they form soft peaks. Add in the sugars, a spoonful at a time until it has all been incorporated and the mixture forms stiff peaks. Spoon the mixture onto the preprepared baking trays, doing your best to stay within your pencil-drawn lines! Use a fork to create a jagged top to one of the meringue circles – the extra peaks will give a greater surface area to create the lovely caramelised sugar topping, and add a delightful golden colour to the top of your pavlova.

Turn the oven down to Gas Mark 1/2 (basically as low as it will go!) and bake your pavlova for 1 hour 30 minutes until the layers have a crisp top, a light gold colour and slightly darker points. Remove from the oven, cover with a tea towel and leave to cool completely overnight.

The next day (a few hours before you want to eat it), make the chocolate ganache by melting together the chocolate and chestnut purée. Add the double cream and mix until completely combined. Leave in a cool place for at least 30 minutes, preferably longer until doubled in thickness.

To assemble the final dish, start by whipping the cream and icing sugar together until it forms a soft mass of whipped cream. Place the bottom layer of meringue on a serving plate and then alternate layers of ganache, cream and meringue, ending with the top layer you made earlier. Finish with a final dusting of cocoa powder, and serve in big, delicious wedges.

Baking · Desserts · Europe · Nation Cake Challenge · Pastry

England (Derbyshire): Bakewell Tart

Derbyshire flag

The Bakewell tart can be viewed as the epitome of traditional regional English baking, and as such can ignite a lot of controversy over the correct recipe. A very interesting article by Felicity Cloake from the Guardian’s Word of Mouth blog (from which the basic recipe for this tart is taken from) expounds on the different variations of this recipe throughout its written history, and is well worth a read.

Bakewell Tart

In the interests of honesty and transparency I should say now that this tart is not technically a Bakewell tart as it does not include frangipane. The reason for this arose due to the fact that I was making this in Scottsdale, Arizona, where ground almonds are non-existent. This lack of ingredients was something that had not even occurred to me, so you can imagine my consternation having agreed to make a bakewell tart, yet now wandering around Walmart summarily failing to find the key ingredient. I also managed to completely confuse a helpful supermarket assistant who obviously had no idea what I was talking about. Finally I decided that I would replace the frangipane layer with an almond-flavoured sponge cake, which whilst not traditional, served the purpose very well.

Decoration for this tart is a subject of much debate – whether to leave it plain or to top with the customary white glace icing and cherry, a la Mr. Kipling. My tart represents a compromise, due to the request for the latter style, however feel free to leave this off if you prefer.

Bakewell Tart

Ingredients:

The Pastry:

  • 140g plain flour, plus extra to sprinkle
  • 85g cold butter, plus extra to grease
  • Pinch of salt
  • Ice cold water

The Sponge Topping

  • 4oz caster sugar
  • 4oz unsalted butter, at room temperature
  • 2 eggs
  • 4oz plain flour
  • 1.5 tsp baking powder
  • 1 tbsp almond essence
  • 100g raspberry jam
  • 25g flaked almonds

Instructions

Preheat the oven to 190ºC/Gas Mark 5 and grease and flour a 23in flan tin.

First make the pastry by mixing the flour and salt in a bowl, before grating in the cold butter. Stir just enough cold water into the mixture to bring it together into a ball and wrap in cling film before chilling or an hour.

Roll out the chilled pastry until about 5mm thick and use this to line the tin. Place a piece of baking parchment on top and weigh down with either baking beans or rice. Bake the pastry shell for 15 minutes until golden brown.

Whilst the pastry shell is baking, make the sponge topping by creaming together the butter and sugar before mixing in the eggs, flour, baking powder and almond essence until well combined. Remove the blind-baked pastry shell from the oven and remove the beans/rice and baking parchment. Spread the base of the shell with 100g raspberry jam before topping with the sponge mixture, ensuring a smooth top. Return to the oven and bake for 25 minutes until golden brown and well risen. 5 minutes before the end of the baking time sprinkle the flaked almonds over the top and return to the oven for the last five minutes. Remove from the oven and leave to cool.

If wished, the tart may be decorated with white glace icing and maraschino or glace cherries, however these are not traditional and may be omitted.

Desserts · Ice Cream

I Dream of… Chocolate and Raspberry Ice-Cream

I love ice-cream, very much. However, the problem with living in England is that our range of ice-cream flavours is not that exciting. Yes,  Cornish clotted cream ice-cream is delicious and there are some really delicious ice-creams out there (notably a delicious blackcurrant ice cream that is sold at National Trust properties), but on the whole it’s pretty pedestrian. Many of my holiday memories revolve around ice cream – a dreamy dark chocolate gelato in Dubrovnik, a celery flavoured ice cream in Rome and my first taste of Italy – a canteloupe melon gelato.

After our last holiday to Rome, and after many occasions of me mentioning how much I wished we could have the delicious flavours we sampled at home, I was bought an ice cream maker as a housewarming present. Now the first try of this was rather disappointing – the included recipes were rather lacking in flavour. However, I then bought possibly one of my favourite cook books, David Leibovitz’s The Perfect ScoopThis book is what ice-cream needed; the flavours in this book literally make my head spin with the possibilities.

Chocolate Raspberry Ice Cream

This ice cream was chosen to go with the Prinsesstarta made earlier in the year. Whilst not traditional to serve chocolate ice cream with it, the addition of raspberries to the ice cream gives a tart edge which contrasts well with the sweetness of the creamy cake. However, it is also delicious with fruit, cakes, scraped from the bowl… whatever floats your boat!

chocolate and raspberry icecream

[Note, home-churned ice cream will tend to be less set than the shop bought variety, and then set about a million times harder when frozen – remove it 10 minutes before serving which should make it easier to shovel out!

Chocolate and Raspberry Ice Cream

Ingredients:

  • 360ml double cream
  • 120g caster sugar
  • 40g cocoa powder, the best quality you can get.
  • 240g raspberries.

Instructions:

Place the cream, cocoa powder and sugar in a large saucepan and heat until it come to the boil, whisking regularly (it will start foaming up, this is normal). Remove from the heat and add the raspberries. Leave to cool for 10 minutes, stirring occasionally. Pass the mixture through a sieve to remove the seeds and refrigerate until chilled. Churn in your ice cream maker according to the instructions.

Baking · Cake · Desserts · Europe · Nation Cake Challenge

Romania: Amandine Gateaux

Flag of Romania

Whilst being a popular Romanian cake, this dessert seems to me to have a very French air to it, namely the size and style of the cake. Whilst it appears to be a very popular cake within the country, I can’t find any information about how it developed and why it has become so popular – if anyone does have any information please let me know! To add to the confusion, there is also a french Gateau Amandine which includes almonds and apricots. For the moment then, the cake will have to remain a mystery. However, like many mysterious characters, this cake is intriguing and addictive, drawing you back in for more. A very soft cake, soaked with a coffee-flavoured syrup and filled with a chocolate-cream filling. Topped with a chocolate glaze, this is a chocoholics dream, and simply quite delicious.

DSC_0013

Amandine Gateaux

Ingredients:

Sponge Cake:

  • 260g aster sugar
  • 8 eggs
  • 40ml water
  • 50ml oil
  • 30g cocoa
  • 150g all-purpose flour

Chocolate filling:

  • 4 eggs
  • 200g caster sugar
  • 330g unsalted butter , at room temperature
  • 2.5 tbsp cocoa powder

Coffee Syrup:

  • 400ml water
  • 200g sugar
  • 2 tsbp instant coffee

Chocolate Glaze

  • 250g dark chocolate
  • 150ml whipping cream

Instructions:

Preheat the oven to 180°C/350°F/Gas mark 4, and grease and line a 13x9in baking tin.

Beat the egg whites and water until they form stiff peaks. Mix in the sugar until it dissolves. In a different bowl, mix together the egg yolks and oil, before folding in the egg whites. Combine the flour and cocoa powder and fold gently into the mixture. until just combined. Bake for about 30 minutes until brown and an inserted skewer comes out clean. Remove from the oven and leave to cool.

To make the filling, beat the eggs and sugar over a bain-marie until thick and creamy – lifting the whisk out should result in a ribbon trail being left on the surface. Add half the cocoa powder and mix thoroughly. Remove from the heat and chill. Cream the butter and remaining cocoa powder before combining with the chilled egg mixture. Set aside and allow to cool completely.

For the syrup, combine the water and sugar over a medium heat until the sugar is dissolved. Add the coffee powder and bring to a boil, stirring constantly to allow the granules to dissolve. Remove the mixture from the heat and allow to cool.

To assemble the cake, cut the cooled cake in half horizontally before moistening each part with the coffee syrup. Cover the bottom later of cake with the cocoa filling and place the second layer on top.

Melt the chocolate glaze by heating the chocolate and cream gently until smooth. Set aside for two minutes to allow it to cool slightly before pouring onto the cakes, spreading over the top and sides of the cake. Decorate with chocolate toppings and serve with whipped cream if preferred.

Baking · Desserts · Europe · Nation Cake Challenge · Pastry · Uncategorized

Montenegro: Krempita

montenegro-flag-167-pWhen visiting Dubrovnik, one of the excursions that we made was to have a day tour of Montenegro (or at least such parts as can be reached in the course of one day!). For us, the main parts of this focused on the cities (towns?) of Kotor and Budva. Now besides having an extremely delicious bowl of mussels and an extremely entertaining and informative tour guide (who would divert from the standard tour guide spiel with anecdotes about subjects ranging from James Bond to Roman Abramovich’s yacht – complete with two helipads AND two submarines!), one of my aims was to find some Montenegrin cake, and to actually see what they sell in the local bakeries. This delectable delight was one of those treats found. Whilst I didn’t try it on that trip (squishy vanilla slice on long coach trip -bad idea!), I decided that I definitely wanted to try the recipe at home.

DSC_0002

Krempita is essentially a vanilla custard slice, made with 2 layers of puff pastry sandwiched with a thick vanilla custard-cream. I used puff pastry leftover from making allumettes, but this will work perfectly well with ready-made pastry – don’t try and make life life two difficult if you don’t want to! If on the other hand you do want to have a go at making your own, check out the recipe from here.

DSC_0005

Ingredients:

  • 2 sheets of puff pastry
  • 6 large egg yolks
  • 6 tablespoons sugar
  • 2 tablespoons cornflour
  • 1 1/2 cups milk
  • 2 packages unflavored gelatin
  • 32floz/950ml double cream whipped with 2 tablespoons vanilla sugar
  • Icing sugar

Preparation:

Heat oven to 400°F/200°C/Gas Mark 6. Roll out each piece of puff pastry slightly  and score into 9 sections. Sandwich each puff pastry sheet between two pieces of parchment paper and two cooling racks, to keep it flat but stillcrispy. Bake for 15 minutes, before removing the top rack and top sheet of parchment paper. Replace rack and continue to bake until golden and crispy throughout, before leaving to cool completely.

Whip the egg yolks and sugar until thick and lemon colored before adding the cornflour and milk and mixing thoroughly. Transfer to a bain-marie and coook gently until the custard thickens, stirring constantly. Remove from the heat. Dissolve gelatin completely in 1/2 cup cold water and stir into the hot custard until completely dissolved.

Cool the custard in an ice bath, stirring occasionally. If, for some reason, the custard has lumps (from being cooked at too high a temperature or undissolved gelatin), strain it through a sieve.

When the custard is cool and very thick but not yet set, fold in the sweetened whipped cream. Layer over 1 sheet of baked puff pastry and top with second sheet. Refrigerate at least 1 hour before eating. Cut into rectangles and dust with icing sugar before serving.

When visiting

Desserts · Vegan

Vegan Chocolate and Orange Mousse

I am really excited about this vegan dessert, and so happy it worked! Presenting number two in the vegan dessert duo – Chocolate and Orange mousse!

DSC_0001

I love chocolate mousse. One of my guilty pleasures is those chocolate mousses that come in yoghurt pots, but there is nothing to beat the deliciousness of actual chocolate mousse. However, I have a thing about using raw egg in anything and most recipes for chocolate mousse either have raw egg or so much cream that it turns into a ganache. This however, solves that problem! Four ingredients, 5 minutes and you are sorted with a delicious light pudding that almost feels healthy! Enjoy!

DSC_0007

Vegan Chocolate and Orange Mousse

Ingredients:

  • 1 can of chilled coconut milk
  • 1/4 cup unsweetened cocoa powder
  • Pinch of salt
  • 1 tsp orange liqueur
  • 1/2 cup icing powder

Instructions:

Place the sold layer of coconut cream in a bowl and add the other ingredients. Beat for five until doubled in size and light and fluffy. Serve in small dishes with chocolate shavings to decorate.

I think this might be the easiest recipe in the world. Delicious, simple and very addictive! Come back in two days for a return to cake, and most specifically a Eurovision-themed post! Cannot wait!

Desserts · Vegan

Vegan Coconut and Vanilla Panna Cotta, Macadamia Tuille and Pineapple

Over the next few posts we are going on a slight diversion from the cake-based goodness you are used to, and instead will be talking about dessert. Specifically, vegan desserts, and I will be giving you the recipes for two that I tried recently. This was a new challenge for me, as I am not vegan myself, and have had basically no experience in this type of cooking. However, I was asked to make dessert for a family dinner and one of my cousins who would be in attendance is a very committed vegan. Now, whilst the easy option was to make a fruit salad or the like I decided that I didn’t really want to do that – rather I wanted to make a dessert that everyone could eat and enjoy – one that was vegan without looking vegan!

Now this is easier said than done, as the majority of desserts include some form of animal product, whether it be eggs, butter, cream or honey. Coupled with the fact that Max is strongly allergic to banana (another ingredient often used in vegan cooking) made it quite a large challenge! So I did what every sensible person does in this situation and hit Pinterest.

DSC_0004

I decided that I would make a trial run of several desserts, having never attempted vegan cooking before. I selected three contrasting desserts, made mini tests of each of them and had a taste test! The three recipes were a coconut and vanilla panna cotta, a chocolate and orange mousse and a lime cheesecake. Two out of the three were successful, and the third (the lime cheesecake) was not unsuccessful – it tasted great, I just need a better blender!

Today then, I present the first of these recipes – a vegan coconut and vanilla pannacotta served with a caramel macadamia tuille and both dried and macerated pineapple. This recipe could also be used successfully for non-vegans as the flavours themselves are lovely (I actually adapted the recipe from a non-vegan version!)

DSC_0005

Vegan Coconut and Vanilla Pannacotta, Macadamia Tuille and Pineapple (Two Ways)

Ingredients:

Panna cotta:

  • 20g vegetarian gelling agent
  • 150ml/5floz rice milk (or your preferred milk equivalent)
  • 150ml/5floz cream substitute
  • 25g/1oz caster sugar
  • 1 vanilla pod, split lengthways
  • 100ml/3flz coconut milk

Tuille:

  • 50g macadamia nuts
  • 50ml/2flz orange liqueur
  • 100ml/31/2floz water
  • 150g caster sugar
  • 1 tsp liquid glucose
  • Pineapple and edible flowers to decorate

Instructions:

Panna cotta:

Place the milk, cream, sugar and vanilla pod and heat until the sugar dissolves, before removing the pan from the heat. Stir in the coconut milk, ensuring the mixture is completely smooth. Add the gelling agent to the pan and bring to the boil, ensuring that you stir constantly. Cook for two minutes before removing from the heat and pouring into metal ramekins. Place in the fridge to set for at least two hours.

Macadamia Tuille:

Crush the macadamia nuts in a pestle and mortar, before placing on a baking sheet and gently toasting for a few minutes (keep your eye on them – I can promise you that if you even think of leaving them, they will burn!) Place the liqueur, water, sugar and glucose in a pan and cook over a high heat, swirling the pan occasionally. Allow it to become a nice amber colour, before removing from the heat and pouring onto a silicone baking mat. Spread it with a spatula until it is very thin,and sprinkle with the macadamia nuts. Cut out four discs (about 2in in diameter) and allow to cool completely.

Pineapple Crisps:

Peel and de-eye the pineapple, before cutting very thin slices using a large broad-bladed knife. Lay these on a foil lined baking sheet and bake in the oven at gas mark 1 for about 1 hour until they have started to dry out and the edges have gone golden, turning occasionally. Remove from the oven and leave to dry completely. You can create pineapple flowers by placing the slices in muffin tins to cool. Cut the remainder of the pineapple into cube and place in a bowl with a little lime juice and sugar.

To complete the dish, Remove the panna cotta from the fridge and remove from the mould, loosening with a sharp knife as necessary. Place in the centre of the plate and place the tuille on top. Position pineapple flowers to one side, and add cubes of pineapple. Finish with an edible flower.

And there we go – my first vegan dessert! In two days time, return for chocolate mousse – vegan style!