America · Ice Cream · Salads · Sweets · Travelling

What I eat in Arizona, Part 1

First of all, Southwest Airlines are hilarious- I’m only ever flying with them again! Airline and a stand-up comedy act? Sold.

Featured highlights:

‘If you’re scared of flying, put your head between your knees and tremble until we bring round the alcohol’

‘You are so lucky to have us as your flight crew’ (no lack of confidence there)

‘My guy in Houston writes these leaflets – I know none of you will read them but you should. If there’s an emergency – tough, you’re on your own! (Only joking, obviously look for a crew member!)

[Paraphrased but the gist is there]

They also give very friendly snacks…


During the first few days we have swum, relaxed and eaten a lot of good food, so here follow the highlights!

The first night we ate at Pita Jungle where I was again reminded of the scale of American portions – I ate the  second half of the meal for breakfast the next morning! I had a lentil fatoosh salad which there is no photographic evidence of – it tasted good though!

Dessert did make the camera though – below is an ice cream sandwich made of a chocolate chip cookie, a s’mores cookie with mint chocolate chip ice cream and hot Nutella (hence the salad before…)


(They also gave us free brownies (2) and 12 white chocolate macadamia nut cookies as we were there at closing time!)

The next day we went to one of my favourite lunch places – Flower Child. Basically a hippie place (even including a ‘yoga mat parking’ spot) it specialises in bowls, salads and other tasty things. I had a Vietnamese salad bowl with tofu which was delicious, but I was also very taken by the drinks – honey-lavender-limeade, elderflower-rose lemonade and strawberry-lemonade, all on tap!


Then we had a quick tour around some of the amazing houses in the local area before heading to Creamistry – my favourite ice-cream place! Based on some – very dodgy – liquid nitrogen freezing principles you can create your own ice-cream by choosing a base, flavourings and toppings. Below we have a creamy base, tiramisu flavour with hot fudge sauce on the top. (Again, salad for supper!)


I do also get hugely excited by watching them make the ice-cream in front of you! We are planning on going again later in the week and then I plan to go a little more experimental with flavours.

​​

Also, this is what a Malteaser looks like in the States…

Until next time then, happy eating!

Cake · Europe · Nation Cake Challenge

Austria: Sachertorte

Flag of Austria

The choice of cake for Austria was very simple: the Sachertorte. One of the most famous Viennese delicacies, no description of Austrian cakes would be complete without mention of this fantastic gateaux.

The story goes that the cake was invented in 1832, then Prinz Wenzel von Metternich asked his head chef to create a magnificent dessert, suitable for serving to many distinguished guests who he would be entertaining that evening. However, due to illness the task actually fell to his 16 year-old apprentice, Franz Sacher. The prince was delighted with the result, reportedly claiming ‘Let there be no shame on me tonight!’ The dessert was the source of much controversy over the correct construction of the cake in the early 20th century, resulting in the Hotel Sacher being granted the rights to use the name ‘The Original Sachertorte’ for their cake.

The recipe below is the original recipe for Sachertorte, taken from the book Viennese Cooking’

Sachertorte

Ingredients:

Cake:

  • 3/4 cup (170 g) butter
  • 6 1/2 oz. (180 g) semi-sweet chocolate
  • 3/4 cup (170 g) sugar
  • 8 egg yolks
  • 1 cup (120 g) flour
  • 10 egg whites, stiffly beaten
  • 2 tbls. apricot jam

Icing:

  • 1 cup (225 g) sugar
  • 1/3 cup (80 ml) water
  • 7 oz. (200 g) semi-sweet chocolate

Instructions:

Preheat the oven to 275°F(140°C) oven. Grease and line a 8″ cake tin.

Beat the butter until cream and smooth. Melt the chocolate and add to the butter. Add the sugar and stir well. Add the eg yolks one at a time, beating well after each addition. Add the flour and mix gently before folding in the egg whites. Pour the mixture into the pre-prepared tin and bake for about an hour. Remove from the oven and leave to cool.

Slice the cake into two layers. Heat up the apricot jam and spread over the bottom layer, before placing the second layer on top. To make the chocolate icing, heat the sugar and water until it forms thin threads when a spoon is lifted from the pan. Melt the chocolate using a bain-marie, and gradually add the sugar mixture into the melted chocolate. Stir constantly until the mixture coats the back of a spoon. Pour on top of the cake, ensuring a smooth finish on both the sides and the top. Serve in small slices with unsweetened whipped cream.

Desserts

Chocolate-Baileys Panna Cotta with Mascarpone Cream

It’s been such a long time since I posted regularly, and I miss it. I haven’t posted for so long primarily because of the few times I have baked, the results have not been such that I would like to post them on the blog, and also because I just haven’t baked for a while! Call it health-conscious, lazy, what you will – it just hasn’t happened!

However, I’m going to make a real concerted effort to start posting again, primarily bled goods, but also other recipes that I’ve tried. We are making a real effort to eat healthily and cheaply at the moment and this will hopefully start to chronicle this.

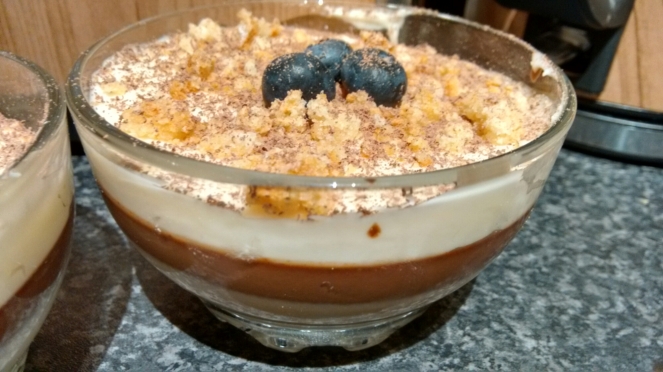
To start with, here is a delicious, impressive but surprisingly simple to make dessert which will impress any diner guests you may have coming over. A layered panna cotta, one flavoured with Bailey’s (Irish Cream Liqueur), the second with dark chocolate, topped with a sweetened mascarpone cream and blueberries. Panna cotta can seem quite intimidating, but I assure you, it is so simple and can be prepared ahead of time for stunning results.

image

I have prepared individual dishes here, but this could also work well as a larger dessert, just be aware it may take longer to set.

Ingredients:

Bailey’s Panna Cotta:

  • 300ml double cream
  • 150ml Baileys/Irish Cream Liqueur
  • 1 sachet of Gelatine, dissolved in 8 tbsp hot water (I used Dr Oetker – see your chosen brand for specific details about amounts if different)

Chocolate Ganache Panna Cotta:

  • 150ml Double cream
  • 1/2 sachet of gelatine, dissolved in 8 tbsp water
  • 75g dark chocolate, chopped

To Finish:

  • 300g mascarpone cheese
  • 4 tbsp icing sugar
  • Grated dark chocolate
  • 6 crushed amaretti biscuits
  • Blueberries, to decorate

Instructions

Make the Bailey’s Panna Cotta by putting the cream, dissolved gelatine and baileys in a small pan over a medium heat, and bring to the boil (stirring constantly). Pour into 6 small serving dishes and leave to set in the fridge for an hour.

Once the hour is up, add the second lot of cream, gelatine and chopped chocolate to a small pan and heat until the chocolate is melted and the mixture is just coming to the boil. Remove from the heat and allow to cool for 2 minutes, before pouring onto the cooled dishes. Return to the refrigerator until completely set.

Before serving, beat the icing sugar and mascarpone cheese until thick and fluffy, adding in a little vanilla if desired. Spoon into a piping bag and pipe a swirl onto the top of each dish, garnishing with some crushed amaretti biscuits, blueberries and grated dark chocolate.

Baking · Biscuits · Cookies

Chocolate Truffle Cookies

I am not always the most patient person in the world. Some things don’t bother me. Transport delays don’t really bother me – I’m generally hideously early so it’s rare that a delay is ever a real problem.

IMG_20140306_163716645

However, when it comes to baking I have no patience. And that is a real problem. Baking is all about patience – waiting for bread to rise, waiting for pies to cook, waiting for cakes to cool in preparation for icing. There is no short cut, you’ve got to let it happen at its own speed. And sadly that’s where I fall short.

IMG_20140306_163637436

Cookies are generally a quick thing to make – a great thing to make after work when you just need a quick fix, right? Well sort of. These are very simple to make, but they do require patience. You have to wait for them to chill, bake and then cool. And you have to let these cool. It may take all your willpower to do this but it will be worth it.

IMG_20140306_163646475

Chocolate Truffle Cookies

Ingredients:

  • 3oz plain flour
  • 1oz cocoa powder
  • 1/2 tsp baking powder
  • 3oz caster sugar
  • 1oz butter
  • 1 egg
  • 10ml kahlua
  • 1 3/4oz icing sugar

Instructions:

Sift the flour, cocoa powder and baking powder together before stirring in the sugar. Rub the butter into the mixture using your fingers until the mixture resembles breadcrumbs.

Mix the egg and kahlua together and add to the butter and dry ingredients. Stir until a dough is formed – this will take MUCH longer than you think! It will come together though, so don’t feel the need to add any more liquid – it will make the mixture too loose. Chill the dough for at least 30 minutes.

Preheat the oven to gas mark 5 and line a large baking sheet with parchment paper. Take walnut sized pieces of the mixture and roll into balls, and then cover with the icing sugar. Be generous as this will give  the cookies the lovely crispy sugar coating. Place the round cookies onto the baking sheet and bake for about 12 minutes, until cracked on the top and firm to the touch. Cool the cookies before serving (if you can wait long enough!)

Baking · Desserts

Chocolate Chestnut Pavlova (A Holiday Miracle)

This year, I was allowed to cook dessert for Christmas Day. Now this is a big honour in our house, my dad guards the kitchen zealously, and it is very unusual for him to allow cooking rights to anyone else! This pressure is high as well – he does an amazing Christmas lunch and dessert has to live up to it!

This then was my creation, a decadent chocolate chestnut pavlova. One of my favourite combinations, this delectable dessert was a fitting centrepiece, converting even the meringue-haters amongst the diners – thus providing a holiday miracle!

IMG_20131225_154035_resized

 This may be completed in a variety of styles – I made a two layer rectangular pavlova, sandwiched with the cream and ganache filling. However, you could also make a smaller three-layered circular pavlova – whatever floats your boat really!

 Chocolate Chestnut Pavlova

 Ingredients

  •  4 egg whites
  • 115g caster sugar
  • 115g icing sugar
  • 150g dark chocolate
  • 200g double cream
  • 50g chestnut puree
  • 100g double cream
  • 20g icing sugar
  • Cocoa powder, to decorate

 Instructions:

Preheat the oven to gas Mark 2. Line two baking sheets with baking parchment and draw three 10-in circles on the parchment. Please don’t use pen – ink and meringue is not a flavour combination I would particularly endorse…

In a scrumptiously clean bowl, whisk your egg whites until they form soft peaks. Add in the sugars, a spoonful at a time until it has all been incorporated and the mixture forms stiff peaks. Spoon the mixture onto the preprepared baking trays, doing your best to stay within your pencil-drawn lines! Use a fork to create a jagged top to one of the meringue circles – the extra peaks will give a greater surface area to create the lovely caramelised sugar topping, and add a delightful golden colour to the top of your pavlova.

Turn the oven down to Gas Mark 1/2 (basically as low as it will go!) and bake your pavlova for 1 hour 30 minutes until the layers have a crisp top, a light gold colour and slightly darker points. Remove from the oven, cover with a tea towel and leave to cool completely overnight.

The next day (a few hours before you want to eat it), make the chocolate ganache by melting together the chocolate and chestnut purée. Add the double cream and mix until completely combined. Leave in a cool place for at least 30 minutes, preferably longer until doubled in thickness.

To assemble the final dish, start by whipping the cream and icing sugar together until it forms a soft mass of whipped cream. Place the bottom layer of meringue on a serving plate and then alternate layers of ganache, cream and meringue, ending with the top layer you made earlier. Finish with a final dusting of cocoa powder, and serve in big, delicious wedges.

Baking · Cake

The Ultimate Chocolate Cake

This is what happens in our house when one of us goes ‘I really feel like some chocolate cake.’ I never go by half measure when chocolate is involved and this is no exception.

chocolate cake 1

The basis is a chocolate chunk sponge, filled and covered with a  dark chocolate ganache. This is then decorated with a selection of chocolates – in this case matchmakers, minstrels, malteasers and mixed chocolate balls. You can’t go wrong.

chocolate cake 2

The Ultimate Chocolate Cake

Ingredients:

Chocolate Cake:

  • 8oz butter
  • 8oz caster sugar
  • 80z self raising flour
  • 4 eggs
  • 2oz cocoa powder
  • 200g dark chocolate, cut into chunks
  • 1 tsp coffee essence

Chocolate Ganache:

  • 300g dark chocolate, broken into pieces.
  • 300g double cream
  • chocolate decorations, as preferred.

Instructions:

Preheat the oven to Gas mark 5, and line an 8in round cake tin.

Beat together the butter and sugar, before beating in each egg, one at a time. Add the flour, cocoa powder and coffee essence and mix thoroughly. Add the chocolate chunks, and stir through the mixture. Pour the mixture into the cake tin and bake for 1 hour, until an inserted cocktail stick comes out clean. Remove from the tin and leave to cool.

Whilst the cake is cooling, heat the cream in a pan until almost boiling. Pour over the chocolate chunks and stir until melted. Leave to cool, which will also allow the mixture to thicken.

Using a large serrated knife, cut the cake in half horizontally, and sandwich with  the chocolate ganache. Spread the rest of the ganache on the top and sides of the cake, and decorate with the chocolates and sweets of your choice. Chill in the fridge for 30 minutes and serve with cream or ice cream.

Baking · Cupcakes · Nation Cake Challenge · South America

Bolivia: Chocolate and Coconut Cupcakes

English: State flag of Bolivia, from the xrmap...

Back to the country cakes, today we are moving continents, over to South America. Two very important ingredients in Bolivian Cuisine are chocolate and coconut, and as these make a brilliant duo, it seemed to be a easy combination to do. Therefore these chocolate coconut cupcakes were born. They are very quick to make and really hit the spot when you just need that chocolate fix!

Coconut Chocolate Cupcakes

To be really authentic, these cupcakes should be made with top quality chocolate and coconut, and the best cocoa powder you can afford. However, it will also taste good when made with good quality chocolate and dessicated coconut, so whatever you have will do!

Chocolate and Coconut Cupcakes

Ingredients:

  • 8oz butter
  • 8oz caster sugar
  • 4 eggs
  • 8oz self raising flour
  • 2 tbsp cocoa powder
  • 2oz dessicated coconut
  • 1 tsp vanilla essence
  • 300g dark chocolate
  • 300g double cream
  • 2 tbsp dessicated coconut, to decorate.

Instructions:

Preheat the oven to gas mark 5 and line a cupcake tray. Cream together the butter and sugar before adding in the eggs and mixing well. Add the rest of the dry ingredients and beat well, before finally mixing in the vanilla essence. Spoon in the cupcake liners and bake for 30 minutes until risen and firm. Remove from the oven and cool for 10 minutes before removing the cupcakes. Allow them to cool completely on a wire rack.

Make the chocolate ganache by melting the chocolate in a bain-marie and then stirring in the double cream. Once completely combined, leave to cool in the fridge for at least 30 minutes until thickened.

Spoon a small amount of ganache onto each cupcake, and swirl slightly with the spoon. Sprinkle the top of each cupcake with extra dessicated coconut. Store in the refrigerator once iced and eat within 3 days.

Baking · Biscuits

Apricot, Almond and White Chocolate Biscotti Jenga

For those of you who have been watching the Great British Bake Off, you may remember the Millionaires shortbread Jenga puzzle created by Frances. Well, I had to get in on that! Also, jenga-stacking biscotti is far more difficult – I think I need some practice to make mine as neat as hers! Here is the result then – Jenga biscotti flavoured with apricots, almonds and white chocolate.

Apricot, Almond and White Chocolate Biscotti

All of us have a favourite combination, one that we will return to time after time. Mine is the combination of apricots and almonds. My favourite treats used to be the apricot and almond crunchies from Thorntons (until they stopped making them – if anyone from Thorntons is reading this please bring them back!). Having both of the ingredients in my cupboard I knew therefore that part of my baking for his week would include this combination. I also wanted to try adding white chocolate to the mix, having seen many other recipes that have combined these ingredients (apparently) successfully.

However, whilst there are many different recipes around, none of them matched exactly to what I wanted. Layer cakes were out – when there are only two of you it becomes a little two much, and having made three different sets of cupcakes over the weeks, that idea was less popular as well (apparently you can have cupcake overkill – who knew?)

Apricot, Almond and White Chocolate Biscotti 2

Then it hit me. Biscotti. Perfect. They can be drunk with my tea, and be taken to work as a quick (albeit unhealthy) breakfast if needed. It was 7.36 in the evening, however Max wasn’t going to be home for a long time, so baking took over! This recipe creates a softer, more chewy biscotti, described by Max as being a cross between a scone and a shortbread, however if you wish it to be more traditionally crispy then by all means bake it for longer.

This recipe is taken from here

Apricot and Almond Biscotti

Ingredients

  • 1/2 cup butter/margarine
  • 1-1/2 cups caster sugar
  • 2 eggs
  • 3 squares white chocolate, melted
  • 1/4 cup orange juice
  • 1 tsp. almond extract
  • 3-1/4 cups flour
  • 2-1/2 tsp baking powder
  • 1 tsp. salt
  • 3/4 cup coarsely chopped toasted whole almonds
  • 3/4 cup coarsely chopped dried apricots
  • 1/2 cup chopped white chocolate

Preheat the oven to 350ºF. Beat margarine and sugar in large bowl with mixer until light and fluffy.  Mix in eggs, chocolate, orange juice and almond extract. Add the flour, baking powder and salt and mix well. Stir in the almonds, white chocolate and dried apricots. Shape the dough into 2 logs and place on a baking tray. Bake for 30 minutes until golden brown. Remove fom the oven and leave to cool for 10 minutes before placing on a chopping board and cutting each log into 16 slices. Place these slices flat on a baking sheet and bake for another 20 minutes, turning halfway through.

Remove from the oven, leave to cool completely before enjoying with a large cup of coffee.

Baking · Cake · Europe · Nation Cake Challenge

Poland: Ciasto Pijak (Drunkards Cake)

Flag ~ Poland ~ Pologne ~ Polska

What surprised me as I became more involved in the researching of recipes for this blog, is how this blog is not just about cake. Of course, cake is the canvas, but more than that the recipes showcase a culture and its history. Eastern European countries are an excellent example of this, in that their foods are closely linked to their heritage – many recipes are either a result of using what was available during the communist occupations, or conversely a resurgence of traditional cultural dishes.

After gaining independence in 1989, Poland (like many others) started a slow food revival, moving away from the many state-owned restaurants to a reaffirming of their cultural heritage. Fast food declined in popularity and far more interest has been given to reviving traditional meals, this recipe being one of them.

I discovered this recipe whilst doing some research into Polish desserts and cakes, and it immediately caught my attention due to the stripes and layering within the cake. I love cakes that look good though the base cake, not just the decoration put on top, and layers are a particularly good way to achieve this. This cake consists of layers of chocolate and poppyseed sponge, sandwiched with cherry compote, topped with pastry cream and ladyfingers soaked in rum (giving the cake its name). The final layer is a melted chocolate and nut topping which acts as a firm shell, resulting in a fantastic contrast of textures within the cake, from the soft sponge and cream to the final crisp and crunchy chocolate shell.

drunkards cake 1

The layers of cake, custard and jam

Drunkards cake 2

With the rum-soaked ladyfingers

drunkards cake 3

With the chocolate and nut shell.

The original recipe was adapted from here. There are several other recipes available, though many of these are in Polish, which led to some interesting translations from Google, which was why I decided to stick to this one! This cake is a bit of a mission as though it is quite simple to make there are a lot of different components, however it is worth it!

Ciasto Pijak (Drunkards Cake)

Ingredients:

Chocolate Sponge Cake:

  • 3 large room temperature eggs
  • 1/3 cup sugar
  • 1/3 cup cake flour + 1 tablespoon cake flour
  • 2 tablespoons Dutch-processed cocoa powder
  • Pinch salt

Poppyseed Sponge Cake:

  • 3 large room-temperature eggs
  • 1/3 cup sugar
  • 1/2 cup cake flour
  • Pinch salt
  • 1/2 cup poppyseeds
  • 1/2 cup dried, sweetened flaked coconut

Crème Patisserie

  • 425ml milk
  • 1 vanilla pod
  • 5 egg yolks
  • 110g caster sugar
  • 2 level tbsp plain flour
  • 1 level tbsp cornflower
  • 10g butter

Other ingredients:

  • 2 cups cherry preserves
  • 1 cup dark rum
  • 1 pack ladyfingers
  • 1 cup chocolate chips
  • 1 tsp vegetable oil
  • 1/2 cup chopped walnuts

Instructions:

Preheat the oven to 350°F and greasing a 13″ by 9″ tin. Set aside. To make the chocolate sponge, place the eggs and sugar in a heat proof bowl and beat over a pan of simmering water for 1 minute, until the sugar has dissolved. Using a handheld whisk, beat on a high setting for about three minutes until the mixture has tripled in volume. Sift the cocoa powder, flour and salt into the bowl, folding gently to just incorporate – you don’t want to stir too much at this point. Spread the batter in the tin and bake for about 12 minutes until cooked. Remove and allow to cool for 10 minutes before removing from the tin and leaving to cool completely.

Next prepare the poppyseed sponge in the same method as the chocolate sponge, beating the eggs and sugar together before sifting in the dry ingredients. Bake for 12 minutes (or until done – do check as all ovens are different!) before cooling and removing from the tin.

Next on the long list of components (it’s worth it I promise you!) is the vanilla pastry cream. Put the milk and vanilla pod in a saucepan and bring to the boil. Take it off the heat and pour it into a bowl, allowing the vanilla pod to infuse the milk. Mix together the sugar and egg yolks until the mixture is pale and thick. Remove the vanilla pod from the milk and discard. Slowly add the milk to the mixture, whisking constantly. Add the flour and cornflower, continuing to whisk the mixture. Return to the pan and bring to the boil, before reducing the heat and simmering the mixture for three minutes, stirring continuously. Remove the mixture from the heat immediately and place into a bowl, covering with a sheet of greased baking parchment to prevent a skin from forming. Leave to cool completely.

Now we are ready to assemble! (Finally, you say.) Start with the chocolate sponge, place it on the serving dish and spread with the cherry compote/preserves. Top with the poppyseed cake before spreading with the pastry cream and placing the cake in the fridge to chill for at least 1 hour.

Dip each ladyfinger in rum before placing them neatly in a single layer on top of the cake. Return to the fridge and chill for another hour. Melt the chocolate and oil together and spread over the top of the cooled cake before sprinkling with the chopped walnuts. Put back in the fridge overnight, and serve cold, cut into small squares.

Chocolate · Sweets

Chocolate Peppermint Bark

Today, I’m sharing with you my new favourite sweet treat, homemade chocolate peppermint bark. Now to be honest I’m not convinced that this needs a recipe, as it is so ridiculously simple, but I felt that it was so delicious, that I just had to share it with you!

Peppermint bark 2

[Note: This recipe can be (and will be) adapted in as many different ways as you see fit, so feel free to change the combinations to match whatever flavours you prefer.]

peppermint bark

Chocolate Peppermint Bark

Ingredients: 

(To make one 9″x9″ pan)

  • 200g dark chocolate (the better the quality, the better the overall product)
  • 200g white chocolate (as above)
  • 1 tsp peppermint extract
  • A few drops of green food colouring
  • 2 peppermint aero bars, roughly chopped

Instructions:

Line a 9″x9″ tin with tin foil. Melt the dark chocolate over a pan of simmering water and pour into the tin, spreading out to cover the bottom. Place in the fridge and leave to set.

Melt the white chocolate over a pan of simmering water and add the green food colouring and peppermint extract. Pour over the set dark chocolate and spread to cover the first layer of chocolate. Cover the top with a layer of chopped mint aero pieces and leave to set in the fridge. Once completely set, break into large pieces, using a sharp knife to help you if needed.